Tutorial sul controller worm 3D per Unity
In questo tutorial, mostrerò come creare un semplice controller worm in Unity, ispirato al tutorial sullo sviluppo di giochi per principianti di TornadoTwins serie.
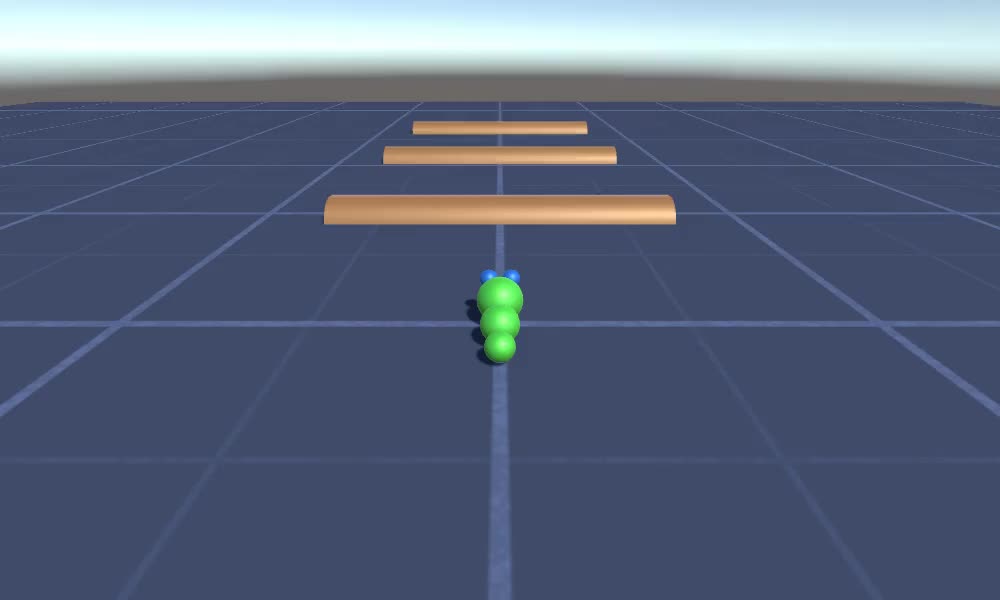
Il controller del verme scivolerà in giro con un morbido effetto coda e avrà la capacità di saltare.
Gli script in questo tutorial sono stati originariamente scritti in JavaScript (aka UnityScript) che non è più supportato, quindi fornirò un'alternativa C#.
Per creare un controller worm in Unity avremo bisogno di:
- Creare gli script necessari
- Crea un personaggio verme
- Assegna gli script al personaggio
Passaggio 1: crea tutti gli script necessari
Iniziamo creando tutti gli script necessari per configurare un controller worm:
- Crea un nuovo script, chiamalo "SC_WormController" e incolla al suo interno il codice qui sotto:
SC_WormController.cs
using System.Collections;
using System.Collections.Generic;
using UnityEngine;

[RequireComponent(typeof(CharacterController))]
public class SC_WormController : MonoBehaviour
{
    public float speed = 3.0f;
    public float rotateSpeed = 1.0f;
    public float jumpSpeed = 5.0f;
    public float gravity = 9.8f;

    CharacterController controller;
    Vector3 moveDirection;

    // Start is called before the first frame update
    void Start()
    {
        controller = GetComponent<CharacterController>();
    }

    // Update is called once per frame
    void Update()
    {
        // Rotate around y - axis
        transform.Rotate(0, Input.GetAxis("Horizontal") * rotateSpeed, 0);

        // Move forward / backward
        Vector3 forward = transform.TransformDirection(Vector3.forward);
        float curSpeed = speed * Input.GetAxis("Vertical");
        float movementDirectionY = moveDirection.y;
        moveDirection = forward * curSpeed;

        // Jumping
        if (Input.GetButtonDown("Jump") && controller.isGrounded)
        {
            moveDirection.y = jumpSpeed;
        }
        else
        {
            moveDirection.y = movementDirectionY;
        }

        // Apply gravity. Gravity is multiplied by deltaTime twice (once here, and once below
        // when the moveDirection is multiplied by deltaTime). This is because gravity should be applied
        // as an acceleration (ms^-2)
        if (!controller.isGrounded)
        {
            moveDirection.y -= gravity * Time.deltaTime;
        }

        // Move the controller
        controller.Move(moveDirection * Time.deltaTime);
    }
}- Crea un nuovo script, chiamalo "SC_CameraFollow" e incolla al suo interno il codice qui sotto:
SC_CameraFollow.cs
using System.Collections;
using System.Collections.Generic;
using UnityEngine;

public class SC_CameraFollow : MonoBehaviour
{
    /*
    This camera smoothers out rotation around the y-axis and height.
    Horizontal Distance to the target is always fixed.

    There are many different ways to smooth the rotation but doing it this way gives you a lot of control over how the camera behaves.

    For every of those smoothed values we calculate the wanted value and the current value.
    Then we smooth it using the Lerp function.
    Then we apply the smoothed values to the transform's position.
    */

    // The target we are following
    public Transform target;
    // The distance in the x-z plane to the target
    public float distance = 10.0f;
    // the height we want the camera to be above the target
    public float height = 5.0f;
    // How much we
    public float heightDamping = 2.0f;
    public float rotationDamping = 3.0f;

    void LateUpdate()
    {
        // Early out if we don't have a target
        if (!target)
            return;

        // Calculate the current rotation angles
        float wantedRotationAngle = target.eulerAngles.y;
        float wantedHeight = target.position.y + height;
        float currentRotationAngle = transform.eulerAngles.y;
        float currentHeight = transform.position.y;

        // Damp the rotation around the y-axis
        currentRotationAngle = Mathf.LerpAngle(currentRotationAngle, wantedRotationAngle, rotationDamping * Time.deltaTime);

        // Damp the height
        currentHeight = Mathf.Lerp(currentHeight, wantedHeight, heightDamping * Time.deltaTime);

        // Convert the angle into a rotation
        Quaternion currentRotation = Quaternion.Euler(0, currentRotationAngle, 0);

        // Set the position of the camera on the x-z plane to:
        // distance meters behind the target
        transform.position = target.position;
        transform.position -= currentRotation * Vector3.forward * distance;

        // Set the height of the camera
        transform.position = new Vector3(transform.position.x, currentHeight, transform.position.z);

        // Always look at the target
        transform.LookAt(target);
    }
}- Crea un nuovo script, chiamalo "SC_SmoothFollow" e incolla al suo interno il codice qui sotto:
SC_SmoothFollow.cs
using System.Collections;
using System.Collections.Generic;
using UnityEngine;

public class SC_SmoothFollow : MonoBehaviour
{
    // The target we are following
    public Transform target;
    // The distance in the x-z plane to the target
    public float distance = 10.0f;
    // the height we want the camera to be above the target
    public float height = 5.0f;
    // How much we
    public float heightDamping = 2.0f;
    public float rotationDamping = 3.0f;

    // Start is called before the first frame update
    void Start()
    {
        if (!target) return;

        transform.LookAt(target);
    }

    void LateUpdate()
    {
        // Early out if we don't have a target
        if (!target) return;

        // Calculate the current rotation angles
        float wantedRotationAngle = target.eulerAngles.y;
        float wantedHeight = target.position.y + height;

        float currentRotationAngle = transform.eulerAngles.y;
        float currentHeight = transform.position.y;

        // Damp the rotation around the y-axis
        currentRotationAngle = Mathf.LerpAngle(currentRotationAngle, wantedRotationAngle, rotationDamping * Time.deltaTime);

        // Damp the height
        currentHeight = Mathf.Lerp(currentHeight, wantedHeight, heightDamping * Time.deltaTime);

        // Convert the angle into a rotation
        var currentRotation = Quaternion.Euler(0, currentRotationAngle, 0);

        // Set the position of the camera on the x-z plane to:
        // distance meters behind the target
        transform.position = target.position;
        transform.position -= currentRotation * Vector3.forward * distance;

        // Set the height of the camera
        transform.position = new Vector3(transform.position.x, currentHeight, transform.position.z);

        // Always look at the target
        transform.LookAt(target);
    }
}
Passaggio 2: crea un personaggio verme
Il prossimo passo è creare un personaggio verme:
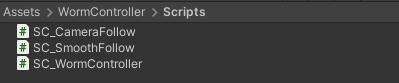
- Crea una nuova sfera (GameObject -> Oggetto 3D -> Sfera) cambia la sua posizione in (0, 0, 0), elimina il suo componente SphereCollider e rinominalo in "Worm"
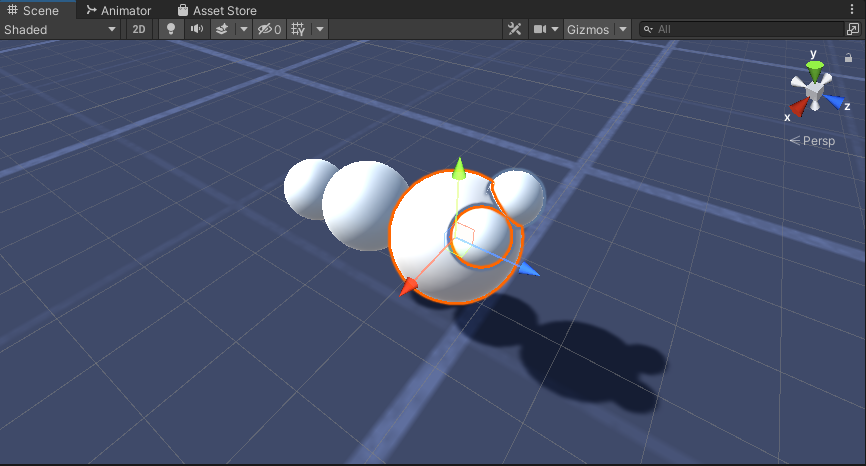
- Duplica la sfera "Worm", rinominala in "BodyPart1", cambia la sua posizione in (0, -0.1, -0.9) e cambia la sua scala in (0.8, 0.8, 0.8)
- Duplica nuovamente la sfera "Worm", rinominala in "BodyPart2", cambia la sua posizione in (0, -0.2, -1.6) e cambia la sua scala in (0.6, 0.6, 0.6)

- Fare clic con il tasto destro sull'oggetto "Worm" -> Crea vuoto e rinominare l'oggetto appena creato in "Eyes"
- Duplica la sfera "BodyPart2", rinominala in "Eye" e spostala all'interno dell'oggetto "Eyes", cambia la sua posizione in (-0.24, 0.353, 0.324) e cambia la sua scala in (0.4, 0.4, 0,4)
- Duplica la sfera "Eye" e cambia la sua posizione X in 0,24
- Per la visualizzazione puoi creare alcuni materiali, ad esempio verde per il corpo e blu per gli occhi.
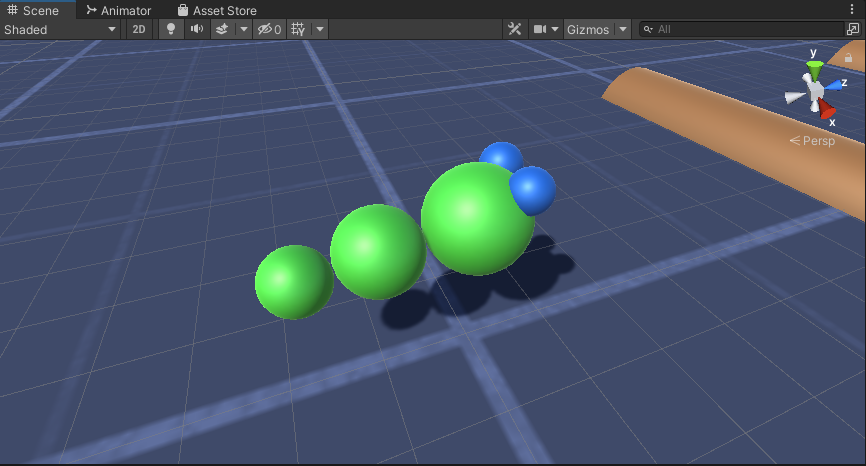
Il personaggio del verme è pronto.
Passaggio 3: configurare il controller worm
L'ultimo passaggio consiste nell'assegnare gli script:
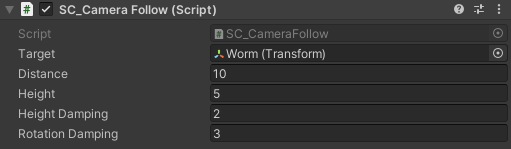
- Collega lo script SC_CameraFollow all'oggetto Main Camera e assegna la sfera "Worm" alla variabile target:
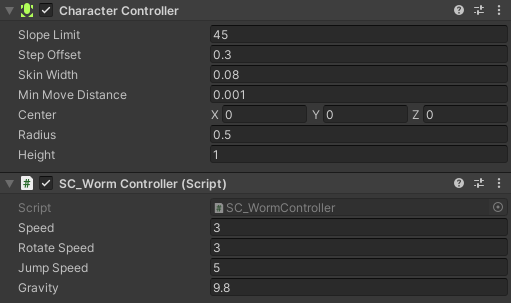
- Collega lo script SC_WormController alla sfera "Worm" (aggiungerà automaticamente un altro componente chiamato CharacterController):
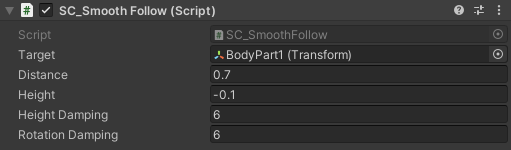
- Collega lo script SC_SmoothFollow alla sfera "BodyPart1" e imposta i suoi valori come nello screenshot di seguito:
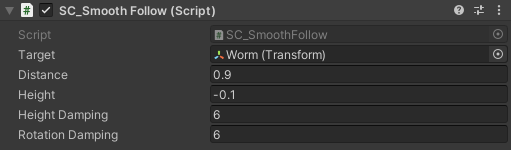
- Collega lo script SC_SmoothFollow alla sfera "BodyPart2" e imposta i suoi valori come nello screenshot di seguito:
Il controller è ora pronto, usa W, A, S e D per muoverti e Spazio per saltare.
Il pacchetto Unity di origine è disponibile di seguito.