Crea un gioco multiplayer in Unity usando PUN 2
Ti sei mai chiesto cosa serve per creare un gioco multiplayer all'interno di Unity?
A differenza dei giochi per giocatore singolo, i giochi multiplayer richiedono un server remoto che svolga il ruolo di bridge, consentendo ai client di gioco di comunicare tra loro.
Al giorno d'oggi numerosi servizi si occupano dell'hosting del server. Uno di questi servizi è Photon Network, che utilizzeremo per questo tutorial.
PUN 2 è l'ultima versione della loro API che è stata notevolmente migliorata rispetto alla versione precedente.
In questo post, eseguiremo il download dei file necessari, la configurazione di Photon AppID e la programmazione di un semplice esempio multiplayer.
Unity versione utilizzata in questo tutorial: Unity 2018.3.0f2 (64 bit)
Parte 1: configurazione del PUN 2
Il primo passo è scaricare un pacchetto PUN 2 da Asset Store. Contiene tutti gli script e i file necessari per l'integrazione multiplayer.
- Apri il tuo progetto Unity quindi vai su Asset Store: (Finestra -> Generale -> AssetStore) o premi Ctrl+9
- Cerca "PUN 2- Free" quindi fai clic sul primo risultato oppure fai clic qui
- Importa il pacchetto PUN 2 al termine del download
![]()

- Dopo che il pacchetto è stato importato, è necessario creare un ID app Photon, questa operazione viene eseguita sul loro sito Web: https://www.photonengine.com/
- Crea un nuovo account (o accedi al tuo account esistente)
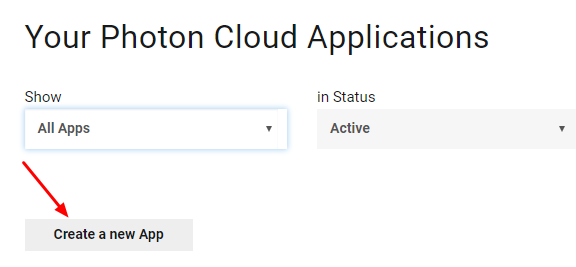
- Vai alla pagina Applicazioni facendo clic sull'icona del profilo, quindi su "Your Applications" o segui questo collegamento: https://dashboard.photonengine.com/en-US/PublicCloud
- Nella pagina Applicazioni fare clic su "Create new app"
- Nella pagina di creazione, per Tipo fotone selezionare "Photon Realtime" e per Nome, digitare un nome qualsiasi quindi fare clic "Create"
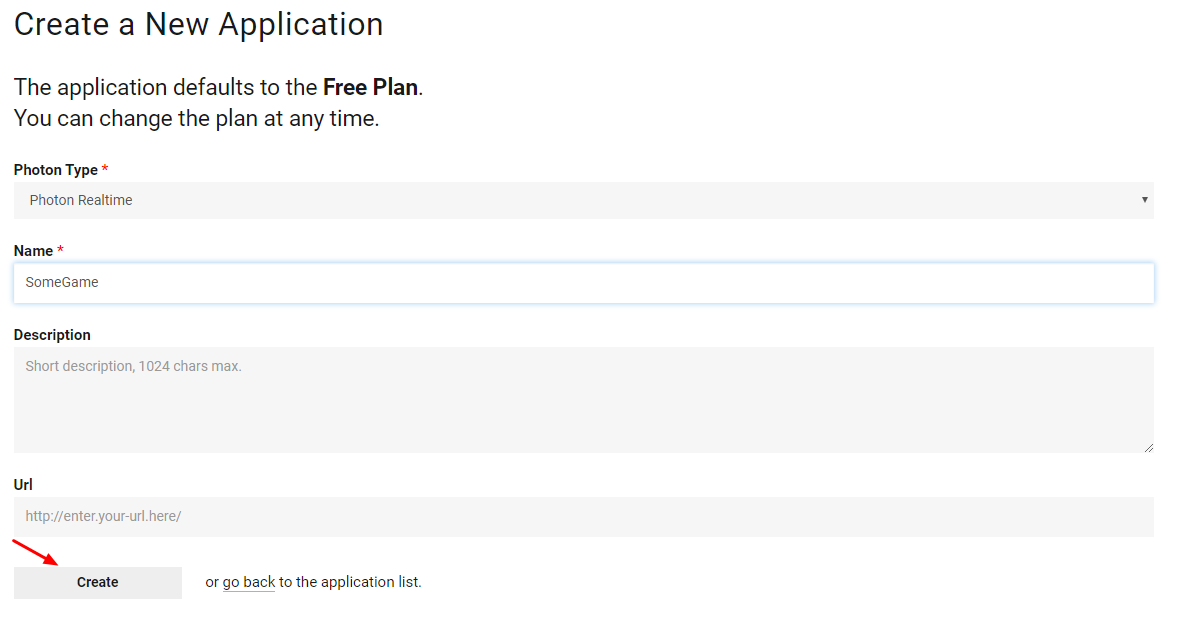
Come puoi vedere, l'applicazione utilizza per impostazione predefinita il piano gratuito. Puoi leggere ulteriori informazioni sui piani tariffari qui
- Una volta creata l'applicazione, copiare l'ID app situato sotto il nome dell'app

- Torna al tuo progetto Unity quindi vai su Finestra -> Photon Unity Networking -> PUN Wizard
- Nella procedura guidata PUN, fai clic su "Setup Project", incolla l'ID app, quindi fai clic su "Setup Project"
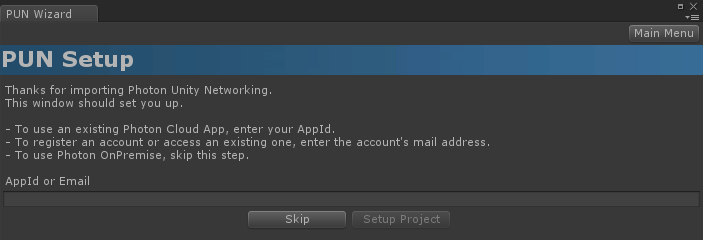
- Il PUN 2 è ora pronto!
Parte 2: Creazione di un gioco multiplayer
Passiamo ora alla parte in cui creiamo effettivamente un gioco multiplayer.
Il modo in cui viene gestito il multiplayer in PUN 2 è:
- Per prima cosa, ci colleghiamo alla Regione Fotonica (es. USA Est, Europa, Asia, ecc.), conosciuta anche come Lobby.
- Una volta nella Lobby, richiediamo tutte le stanze create nella regione, quindi possiamo unirci a una delle stanze o creare la nostra stanza.
- Dopo esserti unito alla stanza, richiediamo un elenco dei giocatori connessi alla stanza e istanziamo le loro istanze del giocatore, che vengono poi sincronizzate con le loro istanze locali tramite PhotonView.
- Quando qualcuno lascia la stanza, la sua istanza viene distrutta e viene rimosso dall'elenco dei giocatori.
1. Creazione di una lobby
Iniziamo creando una scena della lobby che conterrà la logica della lobby (esplorazione delle stanze esistenti, creazione di nuove stanze, ecc.):
- Crea un nuovo script C# e chiamalo PUN2_GameLobby
- Crea una nuova scena e chiamala "GameLobby"
- Nella scena GameLobby crea un nuovo GameObject. Chiamalo "_GameLobby" e assegnagli lo script PUN2_GameLobby
Ora apri lo script PUN2_GameLobby:
Per prima cosa importiamo gli spazi dei nomi Photon aggiungendo le righe seguenti all'inizio dello script:
using Photon.Pun;
using Photon.Realtime;
Inoltre, prima di continuare, dobbiamo sostituire il MonoBehaviour predefinito con MonoBehaviourPunCallbacks. Questo passaggio è necessario per poter utilizzare i callback Photon:
public class PUN2_GameLobby : MonoBehaviourPunCallbacksSuccessivamente, creiamo le variabili necessarie:
    //Our player name
    string playerName = "Player 1";
    //Users are separated from each other by gameversion (which allows you to make breaking changes).
    string gameVersion = "0.9";
    //The list of created rooms
    List<RoomInfo> createdRooms = new List<RoomInfo>();
    //Use this name when creating a Room
    string roomName = "Room 1";
    Vector2 roomListScroll = Vector2.zero;
    bool joiningRoom = false;
Quindi chiamiamo ConnectUsingSettings() nel vuoto Start(). Ciò significa che non appena il gioco si apre, si connette al Photon Server:
    // Use this for initialization
    void Start()
    {
        //This makes sure we can use PhotonNetwork.LoadLevel() on the master client and all clients in the same room sync their level automatically
        PhotonNetwork.AutomaticallySyncScene = true;

        if (!PhotonNetwork.IsConnected)
        {
            //Set the App version before connecting
            PhotonNetwork.PhotonServerSettings.AppSettings.AppVersion = gameVersion;
            // Connect to the photon master-server. We use the settings saved in PhotonServerSettings (a .asset file in this project)
            PhotonNetwork.ConnectUsingSettings();
        }
    }
Per sapere se una connessione a Photon ha avuto esito positivo, dobbiamo implementare queste callback: OnDisconnected(DisconnectCause cause), OnConnectedToMaster(), OnRoomListUpdate(List<RoomInfo> roomList)
    public override void OnDisconnected(DisconnectCause cause)
    {
        Debug.Log("OnFailedToConnectToPhoton. StatusCode: " + cause.ToString() + " ServerAddress: " + PhotonNetwork.ServerAddress);
    }

    public override void OnConnectedToMaster()
    {
        Debug.Log("OnConnectedToMaster");
        //After we connected to Master server, join the Lobby
        PhotonNetwork.JoinLobby(TypedLobby.Default);
    }

    public override void OnRoomListUpdate(List<RoomInfo> roomList)
    {
        Debug.Log("We have received the Room list");
        //After this callback, update the room list
        createdRooms = roomList;
    }
Successivamente c'è la parte dell'interfaccia utente, in cui vengono eseguite l'esplorazione della stanza e la creazione della stanza:
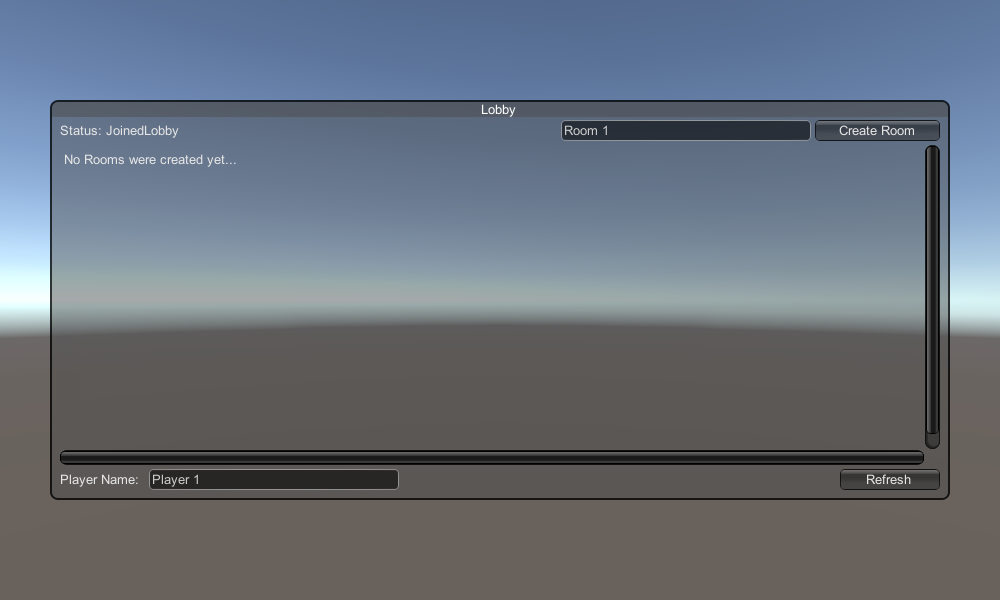
    void OnGUI()
    {
        GUI.Window(0, new Rect(Screen.width / 2 - 450, Screen.height / 2 - 200, 900, 400), LobbyWindow, "Lobby");
    }

    void LobbyWindow(int index)
    {
        //Connection Status and Room creation Button
        GUILayout.BeginHorizontal();

        GUILayout.Label("Status: " + PhotonNetwork.NetworkClientState);

        if (joiningRoom || !PhotonNetwork.IsConnected || PhotonNetwork.NetworkClientState != ClientState.JoinedLobby)
        {
            GUI.enabled = false;
        }

        GUILayout.FlexibleSpace();

        //Room name text field
        roomName = GUILayout.TextField(roomName, GUILayout.Width(250));

        if (GUILayout.Button("Create Room", GUILayout.Width(125)))
        {
            if (roomName != "")
            {
                joiningRoom = true;

                RoomOptions roomOptions = new RoomOptions();
                roomOptions.IsOpen = true;
                roomOptions.IsVisible = true;
                roomOptions.MaxPlayers = (byte)10; //Set any number

                PhotonNetwork.JoinOrCreateRoom(roomName, roomOptions, TypedLobby.Default);
            }
        }

        GUILayout.EndHorizontal();

        //Scroll through available rooms
        roomListScroll = GUILayout.BeginScrollView(roomListScroll, true, true);

        if (createdRooms.Count == 0)
        {
            GUILayout.Label("No Rooms were created yet...");
        }
        else
        {
            for (int i = 0; i < createdRooms.Count; i++)
            {
                GUILayout.BeginHorizontal("box");
                GUILayout.Label(createdRooms[i].Name, GUILayout.Width(400));
                GUILayout.Label(createdRooms[i].PlayerCount + "/" + createdRooms[i].MaxPlayers);

                GUILayout.FlexibleSpace();

                if (GUILayout.Button("Join Room"))
                {
                    joiningRoom = true;

                    //Set our Player name
                    PhotonNetwork.NickName = playerName;

                    //Join the Room
                    PhotonNetwork.JoinRoom(createdRooms[i].Name);
                }
                GUILayout.EndHorizontal();
            }
        }

        GUILayout.EndScrollView();

        //Set player name and Refresh Room button
        GUILayout.BeginHorizontal();

        GUILayout.Label("Player Name: ", GUILayout.Width(85));
        //Player name text field
        playerName = GUILayout.TextField(playerName, GUILayout.Width(250));

        GUILayout.FlexibleSpace();

        GUI.enabled = (PhotonNetwork.NetworkClientState == ClientState.JoinedLobby || PhotonNetwork.NetworkClientState == ClientState.Disconnected) && !joiningRoom;
        if (GUILayout.Button("Refresh", GUILayout.Width(100)))
        {
            if (PhotonNetwork.IsConnected)
            {
                //Re-join Lobby to get the latest Room list
                PhotonNetwork.JoinLobby(TypedLobby.Default);
            }
            else
            {
                //We are not connected, estabilish a new connection
                PhotonNetwork.ConnectUsingSettings();
            }
        }

        GUILayout.EndHorizontal();

        if (joiningRoom)
        {
            GUI.enabled = true;
            GUI.Label(new Rect(900 / 2 - 50, 400 / 2 - 10, 100, 20), "Connecting...");
        }
    }
Infine, implementiamo altre 4 callback: OnCreateRoomFailed(short returnCode, string message), OnJoinRoomFailed(short returnCode, string message), OnCreatedRoom() e OnJoinedRoom().
Queste richiamate vengono utilizzate per determinare se ci siamo uniti/creati la stanza o se si sono verificati problemi durante la connessione.
Ecco lo script finale PUN2_GameLobby.cs:
using System.Collections.Generic;
using UnityEngine;
using Photon.Pun;
using Photon.Realtime;

public class PUN2_GameLobby : MonoBehaviourPunCallbacks
{

    //Our player name
    string playerName = "Player 1";
    //Users are separated from each other by gameversion (which allows you to make breaking changes).
    string gameVersion = "0.9";
    //The list of created rooms
    List<RoomInfo> createdRooms = new List<RoomInfo>();
    //Use this name when creating a Room
    string roomName = "Room 1";
    Vector2 roomListScroll = Vector2.zero;
    bool joiningRoom = false;

    // Use this for initialization
    void Start()
    {
        //This makes sure we can use PhotonNetwork.LoadLevel() on the master client and all clients in the same room sync their level automatically
        PhotonNetwork.AutomaticallySyncScene = true;

        if (!PhotonNetwork.IsConnected)
        {
            //Set the App version before connecting
            PhotonNetwork.PhotonServerSettings.AppSettings.AppVersion = gameVersion;
            // Connect to the photon master-server. We use the settings saved in PhotonServerSettings (a .asset file in this project)
            PhotonNetwork.ConnectUsingSettings();
        }
    }

    public override void OnDisconnected(DisconnectCause cause)
    {
        Debug.Log("OnFailedToConnectToPhoton. StatusCode: " + cause.ToString() + " ServerAddress: " + PhotonNetwork.ServerAddress);
    }

    public override void OnConnectedToMaster()
    {
        Debug.Log("OnConnectedToMaster");
        //After we connected to Master server, join the Lobby
        PhotonNetwork.JoinLobby(TypedLobby.Default);
    }

    public override void OnRoomListUpdate(List<RoomInfo> roomList)
    {
        Debug.Log("We have received the Room list");
        //After this callback, update the room list
        createdRooms = roomList;
    }

    void OnGUI()
    {
        GUI.Window(0, new Rect(Screen.width / 2 - 450, Screen.height / 2 - 200, 900, 400), LobbyWindow, "Lobby");
    }

    void LobbyWindow(int index)
    {
        //Connection Status and Room creation Button
        GUILayout.BeginHorizontal();

        GUILayout.Label("Status: " + PhotonNetwork.NetworkClientState);

        if (joiningRoom || !PhotonNetwork.IsConnected || PhotonNetwork.NetworkClientState != ClientState.JoinedLobby)
        {
            GUI.enabled = false;
        }

        GUILayout.FlexibleSpace();

        //Room name text field
        roomName = GUILayout.TextField(roomName, GUILayout.Width(250));

        if (GUILayout.Button("Create Room", GUILayout.Width(125)))
        {
            if (roomName != "")
            {
                joiningRoom = true;

                RoomOptions roomOptions = new RoomOptions();
                roomOptions.IsOpen = true;
                roomOptions.IsVisible = true;
                roomOptions.MaxPlayers = (byte)10; //Set any number

                PhotonNetwork.JoinOrCreateRoom(roomName, roomOptions, TypedLobby.Default);
            }
        }

        GUILayout.EndHorizontal();

        //Scroll through available rooms
        roomListScroll = GUILayout.BeginScrollView(roomListScroll, true, true);

        if (createdRooms.Count == 0)
        {
            GUILayout.Label("No Rooms were created yet...");
        }
        else
        {
            for (int i = 0; i < createdRooms.Count; i++)
            {
                GUILayout.BeginHorizontal("box");
                GUILayout.Label(createdRooms[i].Name, GUILayout.Width(400));
                GUILayout.Label(createdRooms[i].PlayerCount + "/" + createdRooms[i].MaxPlayers);

                GUILayout.FlexibleSpace();

                if (GUILayout.Button("Join Room"))
                {
                    joiningRoom = true;

                    //Set our Player name
                    PhotonNetwork.NickName = playerName;

                    //Join the Room
                    PhotonNetwork.JoinRoom(createdRooms[i].Name);
                }
                GUILayout.EndHorizontal();
            }
        }

        GUILayout.EndScrollView();

        //Set player name and Refresh Room button
        GUILayout.BeginHorizontal();

        GUILayout.Label("Player Name: ", GUILayout.Width(85));
        //Player name text field
        playerName = GUILayout.TextField(playerName, GUILayout.Width(250));

        GUILayout.FlexibleSpace();

        GUI.enabled = (PhotonNetwork.NetworkClientState == ClientState.JoinedLobby || PhotonNetwork.NetworkClientState == ClientState.Disconnected) && !joiningRoom;
        if (GUILayout.Button("Refresh", GUILayout.Width(100)))
        {
            if (PhotonNetwork.IsConnected)
            {
                //Re-join Lobby to get the latest Room list
                PhotonNetwork.JoinLobby(TypedLobby.Default);
            }
            else
            {
                //We are not connected, estabilish a new connection
                PhotonNetwork.ConnectUsingSettings();
            }
        }

        GUILayout.EndHorizontal();

        if (joiningRoom)
        {
            GUI.enabled = true;
            GUI.Label(new Rect(900 / 2 - 50, 400 / 2 - 10, 100, 20), "Connecting...");
        }
    }

    public override void OnCreateRoomFailed(short returnCode, string message)
    {
        Debug.Log("OnCreateRoomFailed got called. This can happen if the room exists (even if not visible). Try another room name.");
        joiningRoom = false;
    }

    public override void OnJoinRoomFailed(short returnCode, string message)
    {
        Debug.Log("OnJoinRoomFailed got called. This can happen if the room is not existing or full or closed.");
        joiningRoom = false;
    }

    public override void OnJoinRandomFailed(short returnCode, string message)
    {
        Debug.Log("OnJoinRandomFailed got called. This can happen if the room is not existing or full or closed.");
        joiningRoom = false;
    }

    public override void OnCreatedRoom()
    {
        Debug.Log("OnCreatedRoom");
        //Set our player name
        PhotonNetwork.NickName = playerName;
        //Load the Scene called GameLevel (Make sure it's added to build settings)
        PhotonNetwork.LoadLevel("GameLevel");
    }

    public override void OnJoinedRoom()
    {
        Debug.Log("OnJoinedRoom");
    }
}
2. Creazione di un prefabbricato Player
Nei giochi multiplayer, l'istanza del giocatore ha 2 lati: locale e remoto
Un'istanza locale è controllata localmente (da noi).
Un'istanza remota, invece, è una rappresentazione locale di ciò che sta facendo l'altro giocatore. Non dovrebbe essere influenzato dal nostro input.
Per determinare se l'istanza è locale o remota utilizziamo un componente PhotonView.
PhotonView funge da messaggero che riceve e invia i valori che devono essere sincronizzati, ad esempio posizione e rotazione.
Quindi iniziamo creando l'istanza del lettore (se hai già l'istanza del lettore pronta, puoi saltare questo passaggio).
Nel mio caso, l'istanza del Player sarà un semplice Cubo che viene spostato con i tasti W e S e ruotato con i tasti A e D.
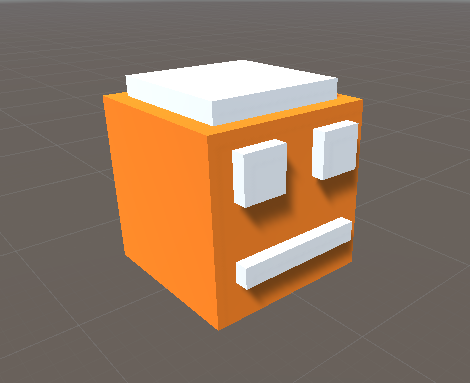

Ecco un semplice script del controller:
SimplePlayerController.cs
using UnityEngine;

public class SimplePlayerController : MonoBehaviour
{

    // Update is called once per frame
    void Update()
    {
        //Move Front/Back
        if (Input.GetKey(KeyCode.W))
        {
            transform.Translate(transform.forward * Time.deltaTime * 2.45f, Space.World);
        }
        else if (Input.GetKey(KeyCode.S))
        {
            transform.Translate(-transform.forward * Time.deltaTime * 2.45f, Space.World);
        }

        //Rotate Left/Right
        if (Input.GetKey(KeyCode.A))
        {
            transform.Rotate(new Vector3(0, -14, 0) * Time.deltaTime * 4.5f, Space.Self);
        }
        else if (Input.GetKey(KeyCode.D))
        {
            transform.Rotate(new Vector3(0, 14, 0) * Time.deltaTime * 4.5f, Space.Self);
        }
    }
}
Il passaggio successivo consiste nell'aggiungere un componente PhotonView.
- Aggiungi un componente PhotonView all'istanza del lettore.
- Crea un nuovo script C# e chiamalo PUN2_PlayerSync (questo script verrà utilizzato per comunicare tramite PhotonView).
Apri lo script PUN2_PlayerSync:
In PUN2_PlayerSync la prima cosa che dobbiamo fare è aggiungere uno spazio dei nomi Photon.Pun e sostituire MonoBehaviour con MonoBehaviourPun e aggiungere anche l'interfaccia IPunObservable.
MonoBehaviourPun è necessario per poter utilizzare la variabile photonView memorizzata nella cache, invece di utilizzare GetComponent<PhotonView>().
using UnityEngine;
using Photon.Pun;

public class PUN2_PlayerSync : MonoBehaviourPun, IPunObservable
Successivamente possiamo passare alla creazione di tutte le variabili necessarie:
    //List of the scripts that should only be active for the local player (ex. PlayerController, MouseLook etc.)
    public MonoBehaviour[] localScripts;
    //List of the GameObjects that should only be active for the local player (ex. Camera, AudioListener etc.)
    public GameObject[] localObjects;
    //Values that will be synced over network
    Vector3 latestPos;
    Quaternion latestRot;
Quindi nel vuoto Start(), controlliamo se il giocatore è Locale o Remoto utilizzando photonView.IsMine:
    // Use this for initialization
    void Start()
    {
        if (photonView.IsMine)
        {
            //Player is local
        }
        else
        {
            //Player is Remote, deactivate the scripts and object that should only be enabled for the local player
            for (int i = 0; i < localScripts.Length; i++)
            {
                localScripts[i].enabled = false;
            }
            for (int i = 0; i < localObjects.Length; i++)
            {
                localObjects[i].SetActive(false);
            }
        }
    }
La sincronizzazione effettiva viene eseguita tramite il callback di PhotonView: OnPhotonSerializeView(PhotonStream stream, PhotonMessageInfo info):
    public void OnPhotonSerializeView(PhotonStream stream, PhotonMessageInfo info)
    {
        if (stream.IsWriting)
        {
            //We own this player: send the others our data
            stream.SendNext(transform.position);
            stream.SendNext(transform.rotation);
        }
        else
        {
            //Network player, receive data
            latestPos = (Vector3)stream.ReceiveNext();
            latestRot = (Quaternion)stream.ReceiveNext();
        }
    }
In questo caso, inviamo solo la posizione e la rotazione del giocatore, ma puoi utilizzare l'esempio sopra per inviare qualsiasi valore necessario per essere sincronizzato sulla rete, ad alta frequenza.
I valori ricevuti vengono quindi applicati nel void Update():
    // Update is called once per frame
    void Update()
    {
        if (!photonView.IsMine)
        {
            //Update remote player (smooth this, this looks good, at the cost of some accuracy)
            transform.position = Vector3.Lerp(transform.position, latestPos, Time.deltaTime * 5);
            transform.rotation = Quaternion.Lerp(transform.rotation, latestRot, Time.deltaTime * 5);
        }
    }
}
Ecco lo script finale PUN2_PlayerSync.cs:
using UnityEngine;
using Photon.Pun;

public class PUN2_PlayerSync : MonoBehaviourPun, IPunObservable
{

    //List of the scripts that should only be active for the local player (ex. PlayerController, MouseLook etc.)
    public MonoBehaviour[] localScripts;
    //List of the GameObjects that should only be active for the local player (ex. Camera, AudioListener etc.)
    public GameObject[] localObjects;
    //Values that will be synced over network
    Vector3 latestPos;
    Quaternion latestRot;

    // Use this for initialization
    void Start()
    {
        if (photonView.IsMine)
        {
            //Player is local
        }
        else
        {
            //Player is Remote, deactivate the scripts and object that should only be enabled for the local player
            for (int i = 0; i < localScripts.Length; i++)
            {
                localScripts[i].enabled = false;
            }
            for (int i = 0; i < localObjects.Length; i++)
            {
                localObjects[i].SetActive(false);
            }
        }
    }

    public void OnPhotonSerializeView(PhotonStream stream, PhotonMessageInfo info)
    {
        if (stream.IsWriting)
        {
            //We own this player: send the others our data
            stream.SendNext(transform.position);
            stream.SendNext(transform.rotation);
        }
        else
        {
            //Network player, receive data
            latestPos = (Vector3)stream.ReceiveNext();
            latestRot = (Quaternion)stream.ReceiveNext();
        }
    }

    // Update is called once per frame
    void Update()
    {
        if (!photonView.IsMine)
        {
            //Update remote player (smooth this, this looks good, at the cost of some accuracy)
            transform.position = Vector3.Lerp(transform.position, latestPos, Time.deltaTime * 5);
            transform.rotation = Quaternion.Lerp(transform.rotation, latestRot, Time.deltaTime * 5);
        }
    }
}
Ora assegniamo uno script appena creato:
- Allega lo script PUN2_PlayerSync a PlayerInstance.
- Trascina e rilascia PUN2_PlayerSync nei componenti osservati di PhotonView.
- Assegna SimplePlayerController a "Local Scripts" e assegna i GameObjects (che vuoi disattivare per i giocatori remoti) a "Local Objects"
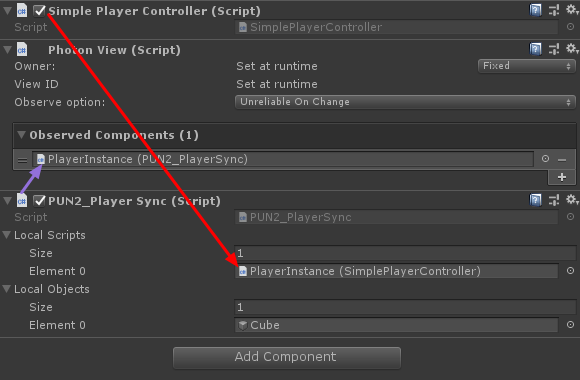
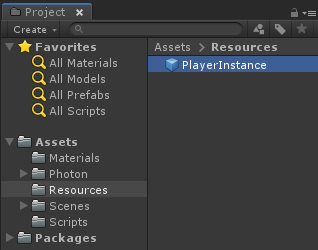
- Salva PlayerInstance in Prefab e spostalo nella cartella denominata Resources (se non esiste una cartella di questo tipo, creane una). Questo passaggio è necessario per poter generare oggetti multiplayer sulla rete.
3. Creazione di un livello di gioco
GameLevel è una scena che viene caricata dopo essere entrati nella stanza ed è lì che avviene tutta l'azione.
- Crea una nuova scena e chiamala "GameLevel" (o se vuoi mantenere un nome diverso, assicurati di cambiare il nome in questa riga PhotonNetwork.LoadLevel("GameLevel"); in PUN2_GameLobby.cs).
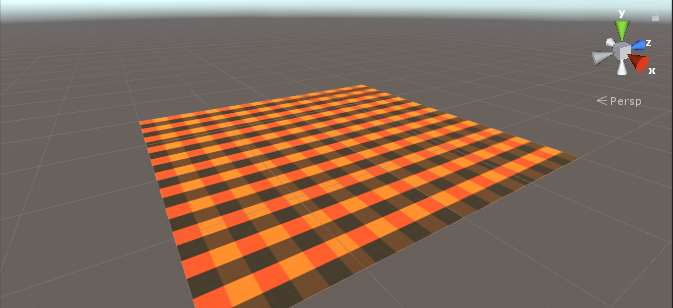
Nel mio caso, utilizzerò una semplice scena con un aereo:
- Ora crea un nuovo script e chiamalo PUN2_RoomController (questo script gestirà la logica all'interno della Room, come generare i giocatori, mostrare l'elenco dei giocatori, ecc.).
Apri lo script PUN2_RoomController:
Come per PUN2_GameLobby, iniziamo aggiungendo gli spazi dei nomi Photon e sostituendo MonoBehaviour con MonoBehaviourPunCallbacks:
using UnityEngine;
using Photon.Pun;

public class PUN2_RoomController : MonoBehaviourPunCallbacks
Ora aggiungiamo le variabili necessarie:
    //Player instance prefab, must be located in the Resources folder
    public GameObject playerPrefab;
    //Player spawn point
    public Transform spawnPoint;
Per istanziare il Player prefab utilizziamo PhotonNetwork.Instantiate:
    // Use this for initialization
    void Start()
    {
        //In case we started this demo with the wrong scene being active, simply load the menu scene
        if (PhotonNetwork.CurrentRoom == null)
        {
            Debug.Log("Is not in the room, returning back to Lobby");
            UnityEngine.SceneManagement.SceneManager.LoadScene("GameLobby");
            return;
        }

        //We're in a room. spawn a character for the local player. it gets synced by using PhotonNetwork.Instantiate
        PhotonNetwork.Instantiate(playerPrefab.name, spawnPoint.position, Quaternion.identity, 0);
    }
E una semplice interfaccia utente con un pulsante "Leave Room" e alcuni elementi aggiuntivi come il nome della stanza e l'elenco dei giocatori connessi:
    void OnGUI()
    {
        if (PhotonNetwork.CurrentRoom == null)
            return;

        //Leave this Room
        if (GUI.Button(new Rect(5, 5, 125, 25), "Leave Room"))
        {
            PhotonNetwork.LeaveRoom();
        }

        //Show the Room name
        GUI.Label(new Rect(135, 5, 200, 25), PhotonNetwork.CurrentRoom.Name);

        //Show the list of the players connected to this Room
        for (int i = 0; i < PhotonNetwork.PlayerList.Length; i++)
        {
            //Show if this player is a Master Client. There can only be one Master Client per Room so use this to define the authoritative logic etc.)
            string isMasterClient = (PhotonNetwork.PlayerList[i].IsMasterClient ? ": MasterClient" : "");
            GUI.Label(new Rect(5, 35 + 30 * i, 200, 25), PhotonNetwork.PlayerList[i].NickName + isMasterClient);
        }
    }
Infine, implementiamo un'altra callback PhotonNetwork chiamata OnLeftRoom() che viene chiamata quando lasciamo la Room:
    public override void OnLeftRoom()
    {
        //We have left the Room, return back to the GameLobby
        UnityEngine.SceneManagement.SceneManager.LoadScene("GameLobby");
    }
Ecco lo script finale PUN2_RoomController.cs:
using UnityEngine;
using Photon.Pun;

public class PUN2_RoomController : MonoBehaviourPunCallbacks
{

    //Player instance prefab, must be located in the Resources folder
    public GameObject playerPrefab;
    //Player spawn point
    public Transform spawnPoint;

    // Use this for initialization
    void Start()
    {
        //In case we started this demo with the wrong scene being active, simply load the menu scene
        if (PhotonNetwork.CurrentRoom == null)
        {
            Debug.Log("Is not in the room, returning back to Lobby");
            UnityEngine.SceneManagement.SceneManager.LoadScene("GameLobby");
            return;
        }

        //We're in a room. spawn a character for the local player. it gets synced by using PhotonNetwork.Instantiate
        PhotonNetwork.Instantiate(playerPrefab.name, spawnPoint.position, Quaternion.identity, 0);
    }

    void OnGUI()
    {
        if (PhotonNetwork.CurrentRoom == null)
            return;

        //Leave this Room
        if (GUI.Button(new Rect(5, 5, 125, 25), "Leave Room"))
        {
            PhotonNetwork.LeaveRoom();
        }

        //Show the Room name
        GUI.Label(new Rect(135, 5, 200, 25), PhotonNetwork.CurrentRoom.Name);

        //Show the list of the players connected to this Room
        for (int i = 0; i < PhotonNetwork.PlayerList.Length; i++)
        {
            //Show if this player is a Master Client. There can only be one Master Client per Room so use this to define the authoritative logic etc.)
            string isMasterClient = (PhotonNetwork.PlayerList[i].IsMasterClient ? ": MasterClient" : "");
            GUI.Label(new Rect(5, 35 + 30 * i, 200, 25), PhotonNetwork.PlayerList[i].NickName + isMasterClient);
        }
    }

    public override void OnLeftRoom()
    {
        //We have left the Room, return back to the GameLobby
        UnityEngine.SceneManagement.SceneManager.LoadScene("GameLobby");
    }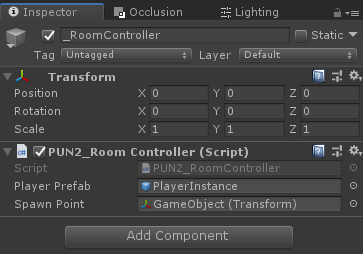
}- Crea un nuovo GameObject nella scena 'GameLevel' e chiamalo "_RoomController"
- Allega lo script PUN2_RoomController all'oggetto _RoomController
- Assegna il prefabbricato PlayerInstance e una trasformazione SpawnPoint, quindi salva la scena
- Aggiungi sia MainMenu che GameLevel alle Impostazioni di costruzione.

4. Realizzare una build di prova
Ora è il momento di creare una build e testarla:
Tutto funziona come previsto!
Bonus
RPC
Nel PUN 2, RPC sta per Remote Procedure Call, viene utilizzato per chiamare una funzione sui client remoti che si trovano nella stessa stanza (puoi leggere di più a riguardo qui).
Gli RPC hanno molti usi, ad esempio diciamo che devi inviare un messaggio di chat a tutti i giocatori nella stanza. Con gli RPC, farlo è semplice:
[PunRPC]
void ChatMessage(string senderName, string messageText)
{
    Debug.Log(string.Format("{0}: {1}", senderName, messageText));
}
Notare [PunRPC] prima della funzione. Questo attributo è necessario se prevedi di chiamare la funzione tramite RPC.
Per chiamare le funzioni contrassegnate come RPC, è necessario un PhotonView. Chiamata di esempio:
PhotonView photonView = PhotonView.Get(this);
photonView.RPC("ChatMessage", RpcTarget.All, PhotonNetwork.playerName, "Some message");
Suggerimento da professionista: se sostituisci MonoBehaviour nello script con MonoBehaviourPun o MonoBehaviourPunCallbacks puoi saltare PhotonView.Get() e utilizzare direttamente photonView.RPC().
Proprietà personalizzate
Nel PUN 2, le proprietà personalizzate sono una tabella hash che può essere assegnata a un giocatore o alla stanza.
Ciò è utile quando è necessario impostare dati persistenti che non necessitano di essere modificati frequentemente (es. Nome della squadra del giocatore, modalità di gioco della stanza, ecc.).
Innanzitutto, devi definire una Hashtable, cosa che viene fatta aggiungendo la riga seguente all'inizio dello script:
//Replace default Hashtables with Photon hashtables
using Hashtable = ExitGames.Client.Photon.Hashtable;
L'esempio seguente imposta le proprietà della stanza denominate "GameMode" e "AnotherProperty":
        //Set Room properties (Only Master Client is allowed to set Room properties)
        if (PhotonNetwork.IsMasterClient)
        {
            Hashtable setRoomProperties = new Hashtable();
            setRoomProperties.Add("GameMode", "FFA");
            setRoomProperties.Add("AnotherProperty", "Test");
            PhotonNetwork.CurrentRoom.SetCustomProperties(setRoomProperties);
        }

        //Will print "FFA"
        print((string)PhotonNetwork.CurrentRoom.CustomProperties["GameMode"]);
        //Will print "Test"
        print((string)PhotonNetwork.CurrentRoom.CustomProperties["AnotherProperty"]);
Le proprietà del lettore sono impostate in modo simile:
            Hashtable setPlayerProperties = new Hashtable();
            setPlayerProperties.Add("PlayerHP", (float)100);
            PhotonNetwork.LocalPlayer.SetCustomProperties(setPlayerProperties);

            print((float)PhotonNetwork.LocalPlayer.CustomProperties["PlayerHP"]);
Per rimuovere una proprietà specifica basta impostarne il valore su null.
            Hashtable setPlayerProperties = new Hashtable();
            setPlayerProperties.Add("PlayerHP", null);
            PhotonNetwork.LocalPlayer.SetCustomProperties(setPlayerProperties);
Tutorial aggiuntivi: